Thursday, February 13, 2014

M-Aspect Stiletto finally finished!


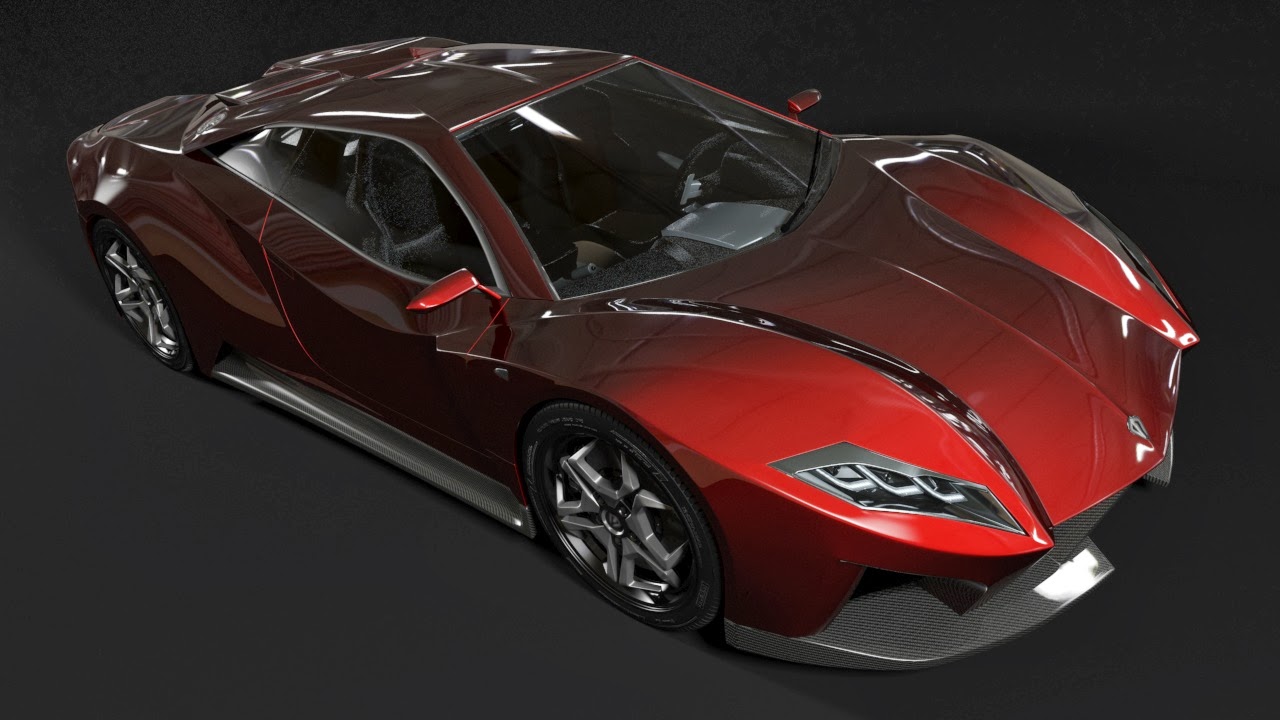
Time to bring out the champagne! The first full 3D car model of mine is finally finished! 

First blueprints were made a full 10 months ago at April 2013 so it was about time. I'm pretty satisfied with the results, the car seems almost like it is in a photo just as I wanted.

When thinking about the whole process now when the car is finished It's hard not to notice that many, many weeks were needed just to fix all those mistakes I made in the beginning. I guess it is always like that when you start to work with a completely new program. Like I said the Stiletto is the first complete model I have made using 3D Studio Max and therefore there was lot to learn. Luckily my friend Olli was there to help! He worked his own 3D car model at the same time and was kind enough to help me during the modeling process. You can find his Green Goblin V12 supercar and his other work here.

There will be more renders later once I manage to go out there and photograph a couple more backgrounds for the renders. I will likely go in depth with the technical stuff about modeling the car later aswell.

If you are interested in the process of making the car, please click here.

Enough talk, time to show some of them renders! If you like (or don't like) what you see, please let me now.

Unsuprisingly the blogger scales down the images. I suggest you hit the link under each picture for the full resolution versions of the images. I uploaded the pictures in my dropbox for now.


Thanks,
Matti


Tuesday, February 11, 2014

A bit more about the tutorials


Hey all!

A bit more about the tutorials to be covered. As I said earlier there were just millions of little things I learned on the way of modeling the Stiletto. Some things were relatively easy to find and some even had exellent video tutorials. Some things, though, were something seriously difficult find instructions to and those are the ones I am about to make tutorials about.

List of to-become tutorials


  • Creating 360 degree HDRI background for renderings using a camera, PTGUI, and finally applying the environment in 3D Studio Max. There are tutorials for this but many require a chrome ball and two tripods. They are really not necessary and you will get better result without.
  • Making a realistic carbon fibre material using Shellac-shader
  • Using FFD modifier to quickly change the shape of your model
  • Creating candy-like paint using mental ray's Car Paint material
There will propably be another blog to cover tutorials only but I will put the links visible to this blog aswell.
Btw. final renderings of Stiletto are on the way!

-Matti


Sunday, February 9, 2014

M-Aspect Stiletto - work in progress


Hey all!


So, the first ever full 3D car project of mine! I named it M-Aspect Stiletto due to the pointy, daggerish shape. The car has been under construction for 9 months when writing this and actually it is really close to finish. I will share some of the material parameters used once finished.


For many years I've wanted to create a full 3D model of a car I designed myself. The applications I've used before (Solidworks, Catia) didin't really suit to modeling such complex shapes a car has and therefore it was time to learn another program - the 3D Studio Max, it would be perfect for the job. The inbuilt mental ray rendering engine would be powerful tool to create photorealistic renders when the modeling part is finished. There was also a good amount of tutorials around the web to help getting started.


The basic shape is from a skecth from my skechbook. I drew a rear view of concept car back in 2012 and started designing the rest of the car around that. The blueprints are made with Photoshop and now, 9 months later, only the top view looks roughly alike the same in the model.


At this point the things are starting to look rather good. The thing is, though, I got bored both to the rear and the front of the car. Especially the headlights needed a change to get the design rid of the Lamborghini look I wasn't after.


New front and rear are getting shape. I also went and took 360° HDR panorama from a park nearby and used it to create reflection and lighting map for the environment. 


Getting there! A new environment of 54 images taken at local mall parking garage stiched together to create sharper reflections and more accurate lighting. There were only 3 different exposures in the HDRI - I suggest you take more. 6 exposures per picture and you get sharper shadows and more detail. I recommend a program called PTGui to stich the HDRs.


Some testing with the camera map and environment/background switcher shaders. Useful info about those can be found from here Also notice the third version of the headlights, may these be final. Just for your information, no Photoshop or any other postprocessing has been used what so ever at this point. 

The leaves of the trees have moved just enough when taking the panorama that the whole HDRI is pretty much useless. Blurry leaves can be clearly seen from the reflections.


Back in the parking garage. This is propably the last WIP image of the Stiletto I will show you. Quite a bit of tweaking with materials has been done since the last renders.


Stay tuned for the final renders! I will post them within a week I hope!

Enjoy your stay!

Hey!

Welcome to my blog!

Me, the writer of this blog is named Matti (hence the M). Some of the readers can perhaps remember me with the name Maza from some forums like Autemo and m-a-z-a at deviantart. I am a mechanical engineering student at Tampere Finland and, like many, have a great passion for cars. Since it has been a bit of an issue with actually owning a car (costs, garage and so on) I have had to find some other ways to work with them. Of course already as a kid all the notebook covers were full of sketches of cars. Then came photomanipulating and the most recent step was a change to 3D modeling.

Photoshop is something I have been using for quite a many years already but 3D modeling and especially the use of 3D Studio Max is something relatively new to me and there will be much to learn. Perhaps the biggest reason for this blog was to collect fellow beginner car modelers a good source of helpful tips and tricks: links to other sites and some things I already found out the hard way about the 3D Studio Max and the inbuilt renderer, mental ray.

The blog will work also as a good way to collect all of my work at the same place for everyone to see. Also showing work in progress with 3D models will become much easier due to this new blog of mine.

 It is a bit of a hassle at first to get everything going. Now there are already different sections to watch my 2D and 3D work. I will add tutorial section soon - there has been tons of things I have learned about 3D modeling within the past year but I try to cover as many of them as possible.

I hope you enjoy what you see and please, comments and critics are always welcome!

- Matti